Building a notification system
In the last chapter we added a two-way email system, allowing applicants to reply to emails sent to them by our users. The trouble with this feature is that users have no way of knowing when an applicant has sent them a reply without opening every applicant’s show page.
Opening every applicant’s record multiple times a day waiting to see if they have responded is not realistic. We can make this feature much more useful by adding in-app notifications each time a user receives a new inbound email.
To do this, we will build a notification system inspired by the wonderful Noticed gem and powered by Turbo Streams and StimulusReflex. When we are finished, logged in users will have a new notification menu item in the main nav that automatically updates when new notifications are received.
Before diving in, let’s talk about why we are building our own notification system instead of just using Noticed. Noticed is the gold standard for building notification systems in Rails applications, in my opinion. It provides everything you will need right out of the box, is extremely powerful, extensible, and easy to work with.
But — Noticed has a ton of features that we will not be using in our application. The extra complexity can be a little overwhelming if you do not need it. Building our own system also helps us learn how Noticed is structured, which makes it much easier to work with when it is time to build a commercial-grade application.
Head into this chapter knowing that we are building something heavily-inspired by Noticed. After this chapter you should be well-equipped to move to Noticed in your own applications and I encourage you to use Noticed instead of rolling your own notification system outside of learning projects.
Create notification model and relationships
At the end of this chapter we will send inbound email notifications to users. Later in this book we will add notifications for other events. Since we know that we plan to have many types of notifications, we will build our Notification model to support single table inheritance.
This structure allows us to define the basic behavior of all notification types in the Notification class while using subclasses to add unique behavior to each type of notification. We will walk through this together.
Let’s start with generating the Notification model. From your terminal:
rails g model Notification user:references read_at:datetime params:jsonb type:string
rails db:migrate
Notifications belong_to a user. The type column is the default column name for inheritance in Rails. Finally, the params column is a jsonb column that we will use to store the data each notification needs to render itself.
This params approach is what you will find used in the Noticed gem and it helps us avoid complicating the data model or running expensive queries to render notifications, which we will see as we progress through this chapter.
Next, update the User model to add the has_many relationship with notifications:
has_many :notifications, dependent: :destroy
And then update the Notification model to add an unread scope and to serialize the params column.
class Notification < ApplicationRecord
  include Rails.application.routes.url_helpers

  belongs_to :user

  scope :unread, -> { where(read_at: nil) }

  serialize :params
end
We are also including Rails url_helpers in the base class because each subclass will need to access path helpers (like applicant_path). Now that we have the base Notification model in place, next we will build the notification class for inbound email notifications.
Each type of notification will be a new class that inherits from the Notification class.
Start from your terminal:
mkdir app/notifications
touch app/notifications/inbound_email_notification.rb
Here we created a new notifications directory where we will create each new notification type, starting with InboundEmailNotification. Before moving on, restart your server to avoid potential Zeitwerk problems with picking up the new directory.
After you restart the Rails server, fill in app/notifications/inbound_email_notification.rb next:
class InboundEmailNotification < Notification
  def message
    "#{params[:email].subject} from #{params[:applicant].name}"
  end

  def url
    applicant_email_path(params[:applicant], params[:email])
  end
end
Notice InboundEmailNotification inherits from Notification, giving it all the same behavior as the base class. Each time we add a new notification, we will add a new class and create the message and url methods for the subclass.
Here the url method uses applicant_email_path, which we can safely use in the model because of the include Rails.application.routes.url_helpers added to the Notification class.
These presentational methods will be used to display the notification in the UI and will typically rely on the serialized params column. Each time we create a new InboundEmailNotification we save the email’s content and applicant information in the params for reference in the message and url methods.
Let’s see how to use this new class by updating the Email model:
after_create_commit :create_notification, if: :inbound?

def create_notification
  InboundEmailNotification.create(
    user: user,
    params: {
      applicant: applicant,
      email: self
    }
  )
end
This new after_create_commit callback only runs for inbound emails since we do not need to notify users about their own outbound emails. The create_notification method creates a new Notification with a type of InboundEmailNotification, passing in the params needed to render this notification later.
If you are new to using single table inheritance in Rails, the InboundEmailNotification.create call is equivalent to Notification.create(type: 'InboundEmailNotification').
At this point creating notifications for new inbound emails is working, but we are not displaying them to users. Let’s tackle that next by adding a notification menu to the authenticated navigation bar.
Add notifications to the UI
Notifications will be displayed in a dropdown menu accessed from the navigation bar and loaded in via a notifications Turbo Frame, similar to how we are loading emails on the applicants show page.
First up, generate a new controller and create the views we need from your terminal:
rails g controller Notifications
touch app/views/notifications/index.html.erb
touch app/views/notifications/_notification.html.erb
And then fill in the notifications index view:
Here we are using Rails collection rendering to render all @notifications. For collection rendering to work with the multiple class names that come with using single table inheritance we need to update the Notification model to override the default to_partial_path. Update app/models/notification.rb like this:
def to_partial_path
  'notifications/notification'
end
Without this change, collection rendering for notifications would attempt to look up the partial based on each notification's class and we would get an error telling us that no partial named "inbound_email_notifications/inbound_email_notification" exists.
Next, fill in the notification partial:
Here we are using the message and url methods defined by each notification subclass to display useful information about the notification to the user. We also have a button to mark the notification as read that does not do anything yet and we are referencing a check-circle svg icon that has not been created.
Create that icon next, from your terminal:
touch app/assets/images/check-circle.svg
And then fill it in:
Finally, update the NotificationsController to define the index action:
class NotificationsController < ApplicationController
  def index
    @notifications = current_user.notifications.order(created_at: :desc)
  end
end
And update routes.rb to add that route to the application:
resources :notifications, only: %i[index]
At this point we have a notification index view ready to display notifications for a user but there is no way for users to see the notifications in the UI. Our next step is adding a notification icon to the authenticated navigation bar and wiring up that icon to open the notifications index page on click.
The first visible piece of notifications in the UI will be an svg icon in the navigation bar, so we'll start there. From your terminal again:
touch app/assets/images/bell.svg
And then fill that in:
Heroicons continues to come through with wonderful free icons for us to use.
Next add a partial for the notification indicator. From your terminal:
touch app/views/nav/_notifications.html.erb
Fill that new partial in like this:
Notice here that we are connecting a dropdown controller with data-controller="dropdown" and adding actions and targets for that controller. This dropdown controller does not exist yet. Once we add the controller, the div with the dropdown-content class will show and hide as the button wrapping the bell icon and the number of notifications is clicked.
Before adding the controller, update the authenticated nav to render this new partial. In app/views/nav/_authenticated.html.erb:
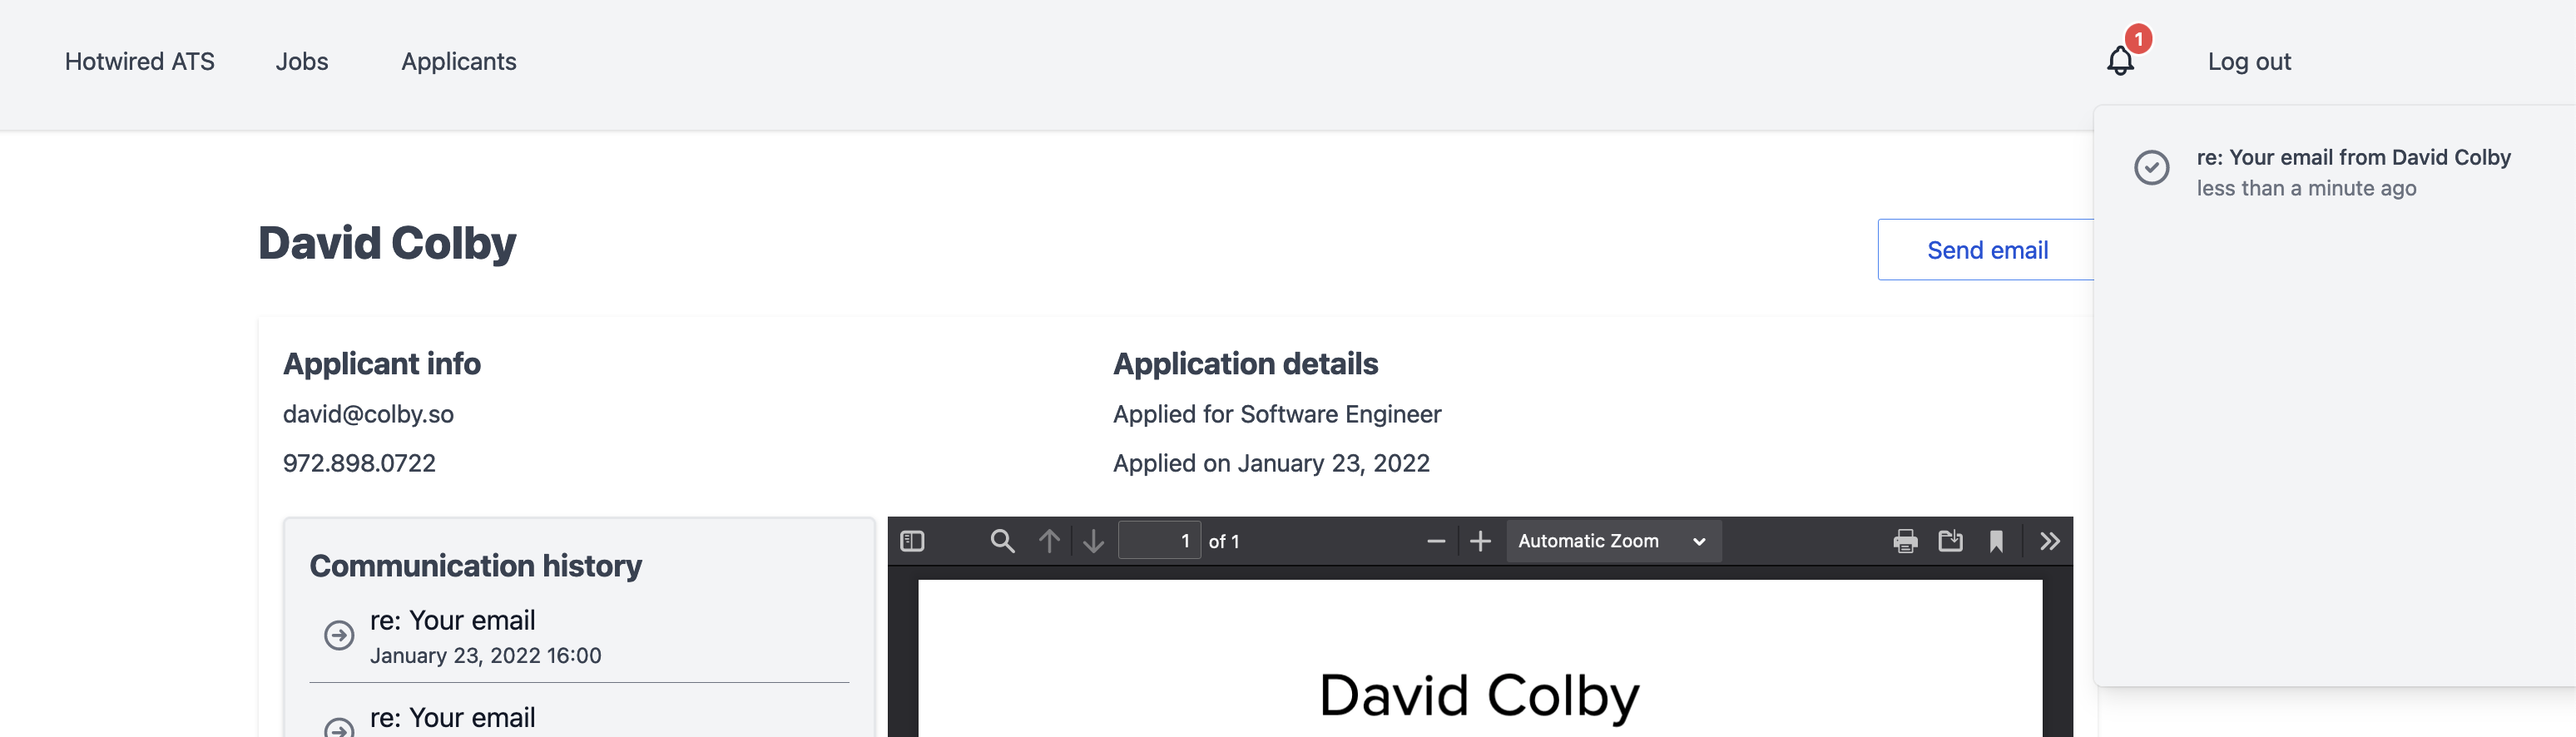
Now if you refresh the page as a logged in user you will see the bell indicator on the top right of the screen along with the number of unread notifications the user has. Clicking on it will not do anything yet. Next we will build a new Stimulus controller to open and close the notifications menu.
Adding a dropdown menu with Stimulus
First, generate a new Stimulus controller from your terminal:
rails g stimulus dropdown
And then fill that controller in like this:
import { Controller } from "stimulus"

export default class extends Controller {
  static targets = ["content"]

  connect() {
    this.open = false
  }

  toggle() {
    if (this.open) {
      this._hide()
    } else {
      this.show()
    }
  }

  show() {
    this.open = true
    this.contentTarget.classList.add("open")
    this.element.setAttribute("aria-expanded", "true")
  }

  _hide() {
    this.open = false
    this.contentTarget.classList.remove("open")
    this.element.setAttribute("aria-expanded", "false")
  }

  hide() {
    if (this.element.contains(event.target) === false && this.open) {
      this._hide()
    }
  }
}
This controller expects a content target and toggles an open class with the show and _hide functions.
The tricky part is the hide function. We do not want the dropdown menu to stay open permanently — any click outside of the menu’s content should close the menu. To accomplish this, in the notifications partial we added a data-action to listen to click events on the window, calling dropdown#hide on each click.
hide checks if the click event occurred within the dropdown menu (this.element ) and if the dropdown menu is open. If the click was outside of the dropdown menu and the menu is open, _hide runs and the dropdown is closed.
Next up, the open class that we are toggling in the Stimulus controller does not exist yet. Define that class next by creating a new css file from your terminal:
touch app/assets/stylesheets/dropdown.css
And then update that file:
.dropdown-content {
  top: calc(100% - 0.25rem);
  left: 50%;
  transform: rotateX(-90deg) translateX(-50%);
  transform-origin: top;
  opacity: 0.1;
  transition: 280ms all ease-out;
  z-index: 20;
}
.dropdown-content.open {
  opacity: 1;
  transform: rotateX(0) translateX(-50%);
  visibility: visible;
}
This CSS is responsible for positioning the dropdown content on screen and adding a simple entry and exit animation.
And then import that css into app/assets/stylesheets/application.tailwind.css:
@import "dropdown.css";
Now that our Stimulus controller is added along with the supporting CSS to open and close the menu, refresh the page and see that you can click on the bell icon to open and close the notifications dropdown menu.
Now would be a good time to create a few inbound email notifications for the user you are testing with. You can use the Rails conductor form for this or (assuming you have already created a few inbound emails), head into the Rails console and run Email.inbound.last.create_notification
Nice work so far! We have two tasks left in this chapter.
First, we will use Turbo Streams to automatically update the user’s notification count each time a new notification is created. Then, we will close the chapter out by allowing users to mark notifications as read with a little bit of StimulusReflex.
Automatic notification broadcasts
In the last chapter we used Turbo Stream broadcasts to prepend new emails to the applicant show page. We will use the same approach to update the unread notification indicator in the navigation bar. Our goal is to keep the count up to date as new notifications come in, without requiring users to refresh the page to see their new notifications.
To do this, start in the Notification model:
after_create_commit :update_users

def update_users
  broadcast_replace_later_to(
    user,
    :notifications,
    target: 'notifications-container',
    partial: 'nav/notifications',
    locals: {
      user: user
    }
  )
end
Here we are using broadcast_replace_later_to to replace the content of the notification menu each time a notification is created. The broadcast is sent to the user who owns the notification, ensuring that the correct user receives the update on the front end.
Next, recall that Turbo Stream broadcasts do not have access to session variables like current_user. The notifications partial currently relies on current_user to display the unread notification count — this will not work when we broadcast the partial from the model so we need to update the partial to use a local reference instead.
Head to app/views/nav/_notifications.html.erb and update it:
Note that both user.notifications.read.exists? and user.notifications.read.count now use a local variable, user, instead of current_user.
Now update the authenticated nav to pass that local variable in when the partial is rendered during page navigation and to subscribe the user to the Turbo Stream notifications channel:
With that last change, refresh the page and then create a new inbound email notification for your logged in user and see that the notification indicator updates automatically.
Now let’s wrap up our notification system by adding the ability for users to mark notifications as read.
Read notifications
In the notification partial, we currently have a Mark as read button rendered alongside each notification, but clicking the button does not do anything yet.
Our aim in this section is to connect that button up to a StimulusReflex action that does two things:
- Mark the notification as read in the database
- Remove the notification from the notification list
We will use StimulusReflex to accomplish both of these tasks. To start, generate a new reflex with the stimulus_reflex generator. From your terminal:
rails g stimulus_reflex Notifications
rails stimulus:manifest:update
This generator creates two files — on the server-side app/reflexes/notifications_reflex.rb and on the client-side app/javascript/controllers/notifications_controller.js. Recall that we need to manually trigger the stimulus:manifest:update command after using the StimulusReflex generator.
Begin filling in the notifications controller:
import ApplicationController from './application_controller'

export default class extends ApplicationController {
  connect () {
    super.connect()
  }

  read() {
    this.stimulate("Notifications#read", this.element)
  }

  beforeRead(element) {
    element.classList.add("opacity-0")
    setTimeout(() => {
      element.remove()
    }, 150);
  }
}
This small Stimulus controller’s primary job is to call this.stimulate when the read action is triggered by a user. Recall from the drag and drop StimulusReflex implementation that stimulate calls a corresponding method on the server which we will add shortly.
The beforeRead function takes advantage of the custom lifecycle callbacks that StimulusReflex provides to remove the element from the DOM before triggering the reflex. Using this before callback allows us to optimistically update the DOM to reflect the user’s desired action without waiting on the server to process the change.
Next, update the NotificationsReflex like this:
class NotificationsReflex < ApplicationReflex
  def read
    notification = element.unsigned[:public]
    notification.read!
    update_notification_count
    morph :nothing
  end

  private

  def update_notification_count
    count = current_user.notifications.unread.count
    if count.positive?
      cable_ready.text_content(selector: '#notification-count', text: count)
    else
      cable_ready.remove(selector: '#notification-count')
    end
  end
end
The read method is the method we call (using stimulate) from the Stimulus controller.
In read, we first set the notification we are acting on with element.unsigned[:public]. StimulusReflex leverages Rails global ids to provide this handy way to access model instances.
Then notification.read! sets the notification read_at timestamp before update_notification_count checks the number of unread notifications the current user has and updates the DOM with the new count. If the user marks their last unread notification as read, update_notification_count removes the indicator badge from the DOM entirely instead.
Finally, morph :nothing tells StimulusReflex not to run a morph since we handled DOM updates in the beforeRead callback and via CableReady with update_notification_count.
For this reflex to work, we need to make updates elsewhere in the code base. First, the read! method isn’t defined in the Notification model. Add that now in app/models/notification.rb:
def read!
  update_column(:read_at, Time.current)
end
And because we are referencing current_user in the reflex to update the notification count, we need to ensure that StimulusReflex has access to the current_user object.
To do this, we will follow the instructions in the wonderful StimulusReflex documentation, starting in app/channels/application_cable/connection.rb:
module ApplicationCable
  class Connection < ActionCable::Connection::Base
    identified_by :current_user

    def connect
      self.current_user = find_verified_user
    end

    protected

    def find_verified_user
      if (current_user = env["warden"].user)
        current_user
      else
        reject_unauthorized_connection
      end
    end

  end
end
And then delegate calls to current_user to connection in app/reflexes/application_reflex.rb, again lifting straight from the documentation:
class ApplicationReflex < StimulusReflex::Reflex
  delegate :current_user, to: :connection
end
With these changes in place, restart your server and then head to app/views/notifications/_notification.html.erb to connect the notifications Stimulus controller to the DOM:
Here on the top level li we connected the controller and added the data-public attribute that we use in the reflex to reference the correct notification in the database.
Then we added a data-action to the Mark as read button, sending clicks on the button to notifications#read to remove the notification from the list and mark it as read in the database.
Now, make sure your user has a couple of unread notifications (create a few from the Rails console with Email.inbound.last.create_notification if you need to) and then open up the notification menu and click the Mark as read button.
If all has gone well, the notification should transition smoothly out of the DOM and be marked as read in the database. At the same time, the unread count indicator badge should count down each time a notification is read.
To finish up this section (and the chapter!) head over to app/controllers/notifications_controller.rb to exclude read notifications from the notifications index page — once we remove them from the DOM we do not want users to see them again.
class NotificationsController < ApplicationController
  def index
    @notifications = current_user.notifications.unread.order(created_at: :desc)
  end
end
Great work in this chapter — we build our own live, reusable notification system with just a little bit of StimulusReflex and a Turbo Stream WebSocket connection.
We have a great base to build new notifications in the future and we have gained an understanding of how a gem like Noticed is constructed so we can more easily adopt it in larger applications after this book is complete.
Before moving on, remember to pause, take a break to reflect, and commit your code if you are following along. You are making great progress so far!
In the next chapter we are going to switch gears a bit and move outside of the administrative interface to build functionality that allows jobs seekers to find open jobs with a company and apply to those jobs.
To see the full set of changes in this chapter, review this pull request on Github.