Applicant comments and user mentions
In most team-based SaaS products, communicating with each other and leaving internal notes on records are core functions. Applicant tracking systems are no different — a basic function of an ATS is the ability for users to leave internal notes on applicants, for themselves or for their team members.
Users may want to record their thoughts after an interview, remind themselves of something an applicant mentioned, or ask a teammate to review an applicant. In our application, we will address this need by building a reusable Comment model.
We will allow users to leave comments on an applicant, review existing comments, and send notifications to other users by mentioning them in a comment. We will also add Sidekiq to the application and move notification creation into background jobs.
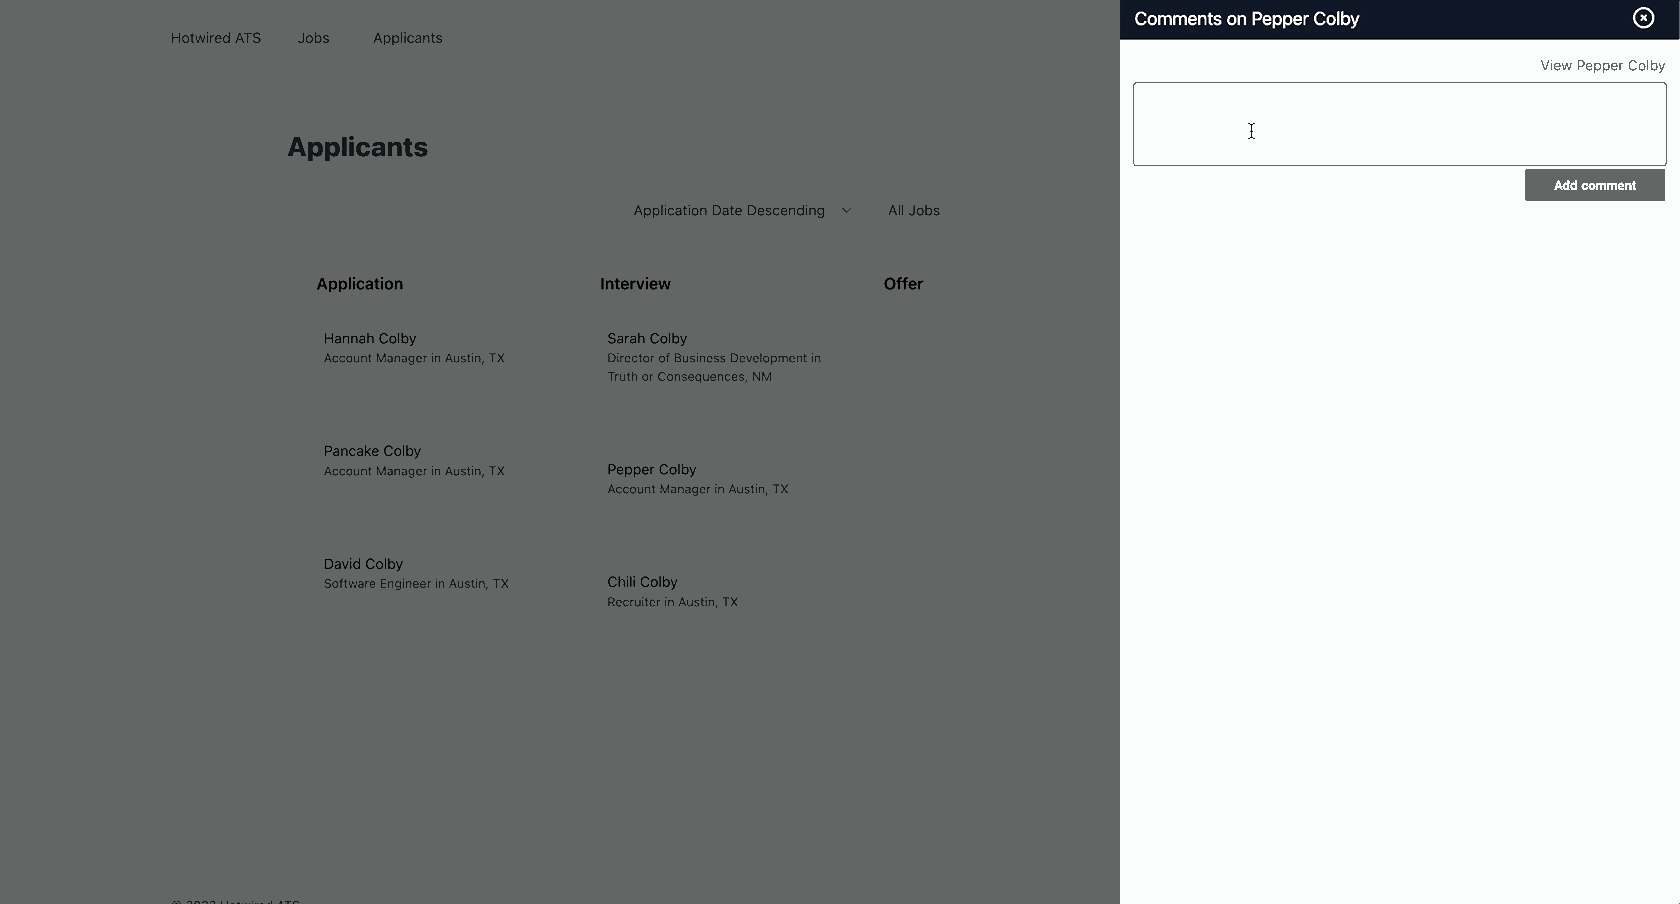
When we finish with the work in this chapter, the commenting system will work like this:
Building the comment resource
In this book we will only add comments to applicants. In a commercial application, it is likely that over time users would want to add comments to other types of resources, like job postings.
For this reason, we will create a generic Comment model that can be reused with other resources in the future, rather than tying comments directly to applicants.
To get started, create a new Comment model from your terminal:
rails g model Comment user:references commentable:references{polymorphic}
rails db:migrate
Instead of a direct applicant reference on the Comment model, we instead create a polymorphic commentable relationship that can be used with applicants, jobs, or anything else we like.
Head to app/models/user.rb to setup the user relationship with comments:
has_many :comments, dependent: :destroy
And then add the commentable association to the Applicant model:
has_many :comments, as: :commentable, dependent: :destroy, counter_cache: :commentable_count
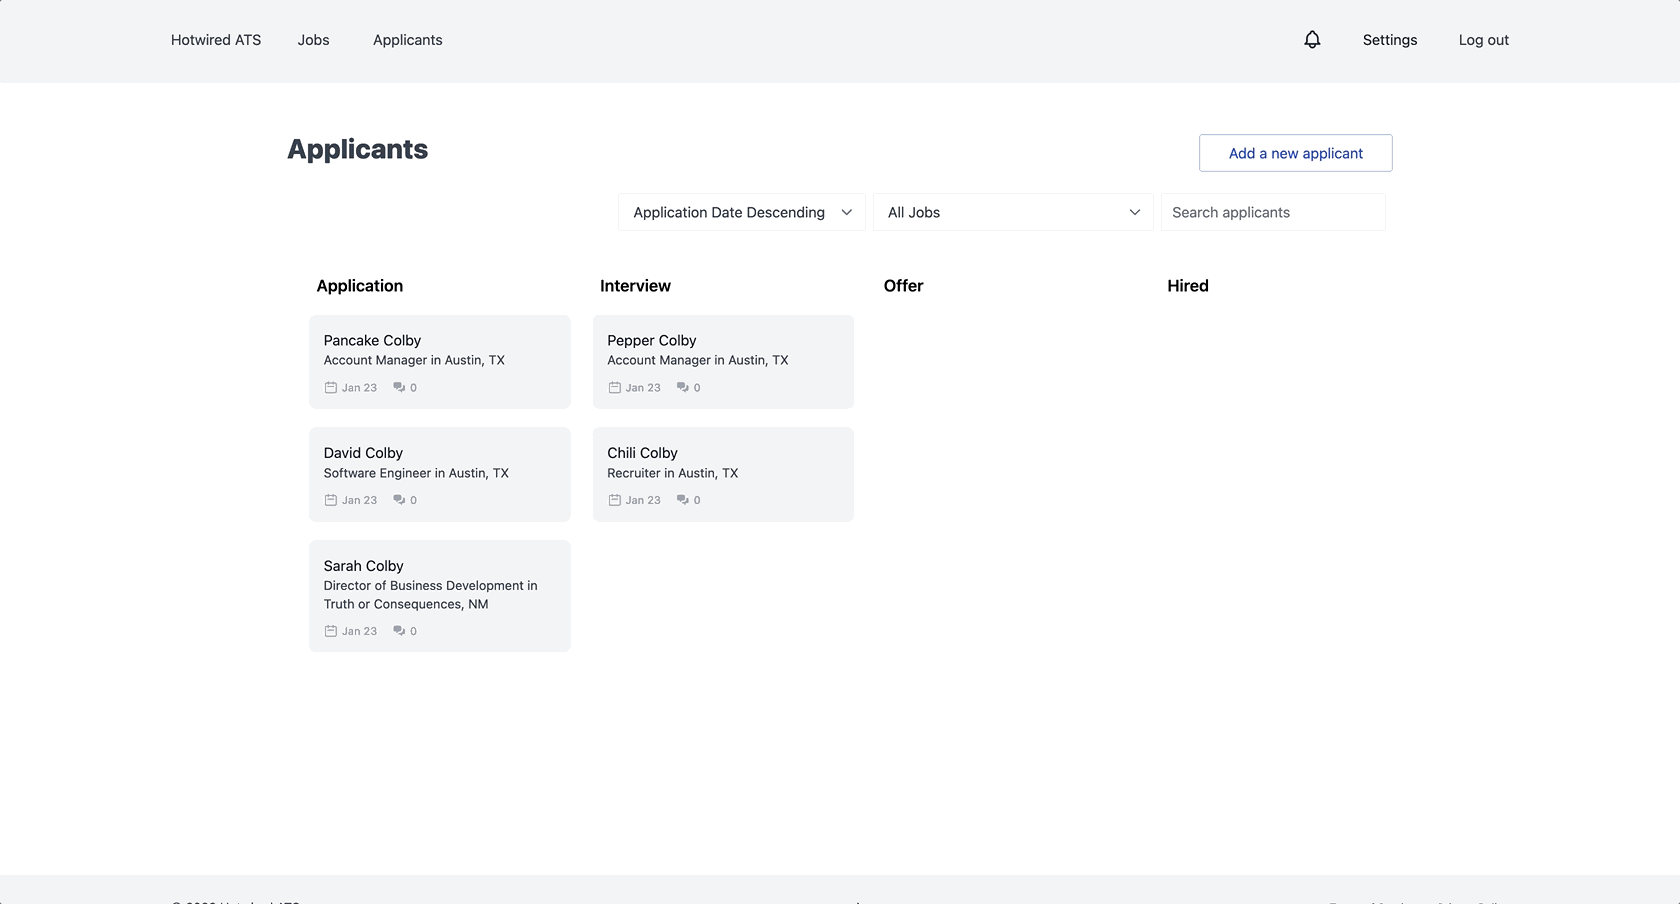
Note here the addition of the counter_cache option to the relationship. We will use the counter cache to easily and efficiently display the number of comments an applicant has on the applicants index page.
While the Rails guides indicate that you do not need to specify the counter_cache relationship on the has_many side of a relationship, that is not true in the case of polymorphic relationships.
Before the counter cache will work, we need to add the commentable_count column to the applicants table. Generate a new migration from your terminal:
rails g migration AddCommmentableCountToApplicants commentable_count:integer
rails db:migrate
In the Comment model, update it to set a counter_cache value and to add a comment rich text field:
class Comment < ApplicationRecord
  belongs_to :user
  belongs_to :commentable, polymorphic: true, counter_cache: :commentable_count

  has_rich_text :comment
end
With the Comment model in place, we need a controller and views to handle creating and viewing comments. From your terminal:
rails g controller Comments
touch app/views/comments/_comments.html.erb app/views/comments/_form.html.erb app/views/comments/_comment.html.erb
Update the CommentsController:
class CommentsController < ApplicationController
  before_action :set_commentable

  def index
    comments = @commentable.comments.includes(:user).with_rich_text_comment.order(created_at: :desc)
    html = render_to_string(partial: 'comments', locals: { comments: comments, commentable: @commentable })
    render operations: cable_car
      .inner_html('#slideover-content', html: html)
      .text_content('#slideover-header', text: "Comments on #{@commentable.name}")
  end

  def create; end

  private

  def comment_params
    params.require(:comment).permit(:comment)
  end

  def set_commentable
    commentable_param = params.keys.detect{ |key| key.include?('_id') }

    @commentable = commentable_param.remove('_id').classify.constantize.find(params[commentable_param])
  end
end
Comments will be viewed and created in our trusty slideover drawer. The index action inserts existing comments for the @commentable resource into the slideover as usual.
The set_commentable method is translating a param like applicant_id from the url into a matching class. This extra bit of work is not necessary while our application only supports commenting on applicants because we know that @commentable will always be an applicant.
We implemented the more complicated version of set_commentable to demonstrate that this controller can be reused for other resources in the future. @commentable could be a Job and set_commentable would still find the correct record.
Head to config/routes.rb to define the new comment routes:
concern :commentable do
  resources :comments, only: %i[index create]
end

resources :applicants, concerns: :commentable do
  # Snip
end
We added a commentable concern to the route definitions and then used that concern on the applicants resource in service of our more complicated but reusable Comment implementation.
This change results in two new nested routes for the applicant resource:
rails routes =>
applicant_comments GET /applicants/:applicant_id/comments(.:format) comments#index
POST /applicants/:applicant_id/comments(.:format) comments#create
Now we will update the partials we need to render comments in the slideover. In app/views/comments/_comments.html.erb:
Note the polymorphic_path call here, which will result in a link to the show page of the commentable resource passed to the method. For us, this means the applicant show page. Again, slightly more complicated so we can see how to reuse the comment resource across the application.
And app/views/comments/_comment.html.erb:
And app/views/comments/_form.html.erb where we use polymorphic_path again:
We will also update Trix styles for the comment form to remove the Trix toolbar entirely and to adjust the height of the Trix editor to a more reasonable size for a comment form. In app/assets/stylesheets/actiontext.css:
Users cannot leave comments on applicants if there is no way to open the comment slideover. Let’s fix that by updating the applicant card partial to add a link to the comments for each applicant.
In the applicants card partial:
The comment link is relying on a new svg icon that we have not created yet. Add that icon next, from your terminal:
touch app/assets/images/chat-bubbles.svg
And fill in the new svg with:
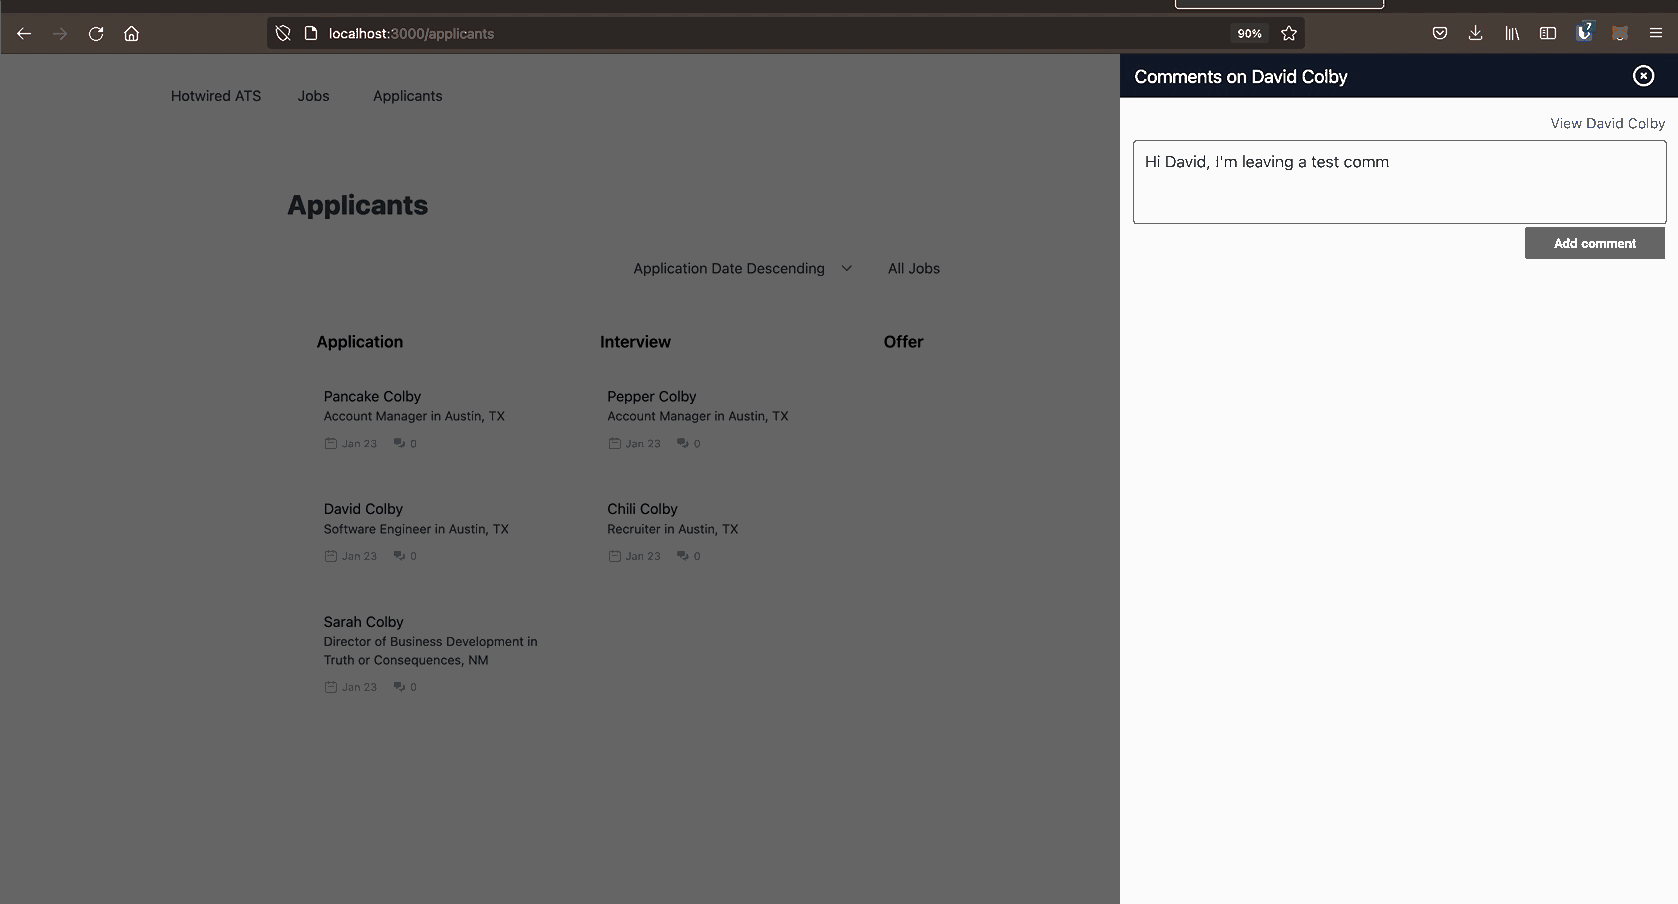
With that change in place, head to the applicants index page and click on the comment icon for any applicant. If all has gone well so far, a slideover should open with the comment form populated.
Submitting the comment form will not work yet because the create action in the CommentsController has not been filled in yet. Head to the CommentsController and update the create action like this:
def create
  @comment = Comment.new(comment_params)
  @comment.commentable = @commentable
  @comment.user = current_user

  if @comment.save
    html = render_to_string(partial: 'comment', locals: { comment: @comment })
    form_html = render_to_string(partial: 'form', locals: { comment: Comment.new, commentable: @commentable })
    render operations: cable_car
      .prepend('#comments', html: html)
      .replace('#comment-form', html: form_html)
  else
    html = render_to_string(partial: 'form', locals: { comment: @comment, commentable: @commentable })
    render operations: cable_car
      .inner_html('#comment-form', html: html), status: :unprocessable_entity
  end
end
In this iteration of using the slideover drawer, instead of closing the drawer on a successful form submission, we instead reset the comment form with a new, empty version of the form and add the newly created comment to the list of comments displayed in the drawer.
Update comment count on new comment creation
You might notice that the number of comments listed on the applicant’s card does not update when a new comment is created. Users have to refresh the page to see the correct comment count.
Thanks to CableReady magic, we can implement this new behavior with almost no extra effort.
First, in app/models/account.rb:
- has_many :applicants, through: :jobs, enable_updates: { on: :create }
+ has_many :applicants, through: :jobs, enable_updates: true
Now CableReady's updates_for will broadcast on all applicant changes, instead of only when new applicants are created. Halfway there.
And then, head to the Comment model:
- belongs_to :commentable, polymorphic: true, counter_cache: :commentable_count
+ belongs_to :commentable, polymorphic: true, counter_cache: :commentable_count, touch: true
That's all of the changes we need to make to get comment counts updated. Really!
Head back to the applicants index page and leave a comment on an applicant. You should see the number of comments update on that applicant’s card immediately after the comment is created.
Mentioning other users
Comments are much more useful if you can bring that comment to another user’s attention by mentioning them in the text of the comment. This pattern of mentioning other users to send them a notification is incredibly common. Without it, comments would be of limited use — why leave a comment if no one will ever know the comment is there without going to look?
We will use tributejs and StimulusReflex to add mentions to our commenting system. Mentioning a user will automatically create a new notification for that user with a link for the mentioned user to view the comment.
The inspiration for this section comes from an excellent GoRails episode demonstrating an integration with tributejs and ActionText. Chris Oliver’s work is foundational to this particular section, and GoRails is a wonderful resource for Rails developers.
Let’s begin by adding tributejs to the application and creating a new reflex. From your terminal:
yarn add tributejs
rails g stimulus_reflex mentions
rails stimulus:manifest:update
Recall that generating a new reflex creates both a server-side reflex and a client-side Stimulus controller.
Head to the new Stimulus controller first:
This is a hefty controller. Let’s break it down a bit.
In the connect method we setup the controller, initializing a new Tribute instance and calling a not-yet-defined reflex with this.stimulate:
connect() {
  super.connect()
  this.editor = this.element.editor
  this.initializeTribute()
  this.stimulate("Mentions#user_list")
}
In initializeTribute, we initialize a new Tribute instance and attach that instance to the controller’s DOM element.
this.tribute = new Tribute({
  allowSpaces: true,
  lookup: 'name',
  values: [],
  noMatchTemplate: function () { return 'No matches!'; },
})
this.tribute.attach(this.element)
The most important option passed in to Tribute is the empty values array. We populate that array with this.stimulate("Mentions#user_list") in the connect lifecycle method and with userListValueChanged.
userListValueChanged() {
  if (this.userListValue.length > 0) {
    this.tribute.append(0, this.userListValue)
  }
}
userListValueChanged takes advantage of built-in Stimulus value change callbacks. At the top of the controller, we defined a userList value, which expects to be an array. When the userList value changes (which the server-side Mentions#user_list reflex will handle), Stimulus runs the userListValueChanged callback which calls Tribute.append to populate the list users that can be mentioned in a comment.
replaced and _pasteHtml handle inserting mentioned users into the Trix editor cleanly, creating a Trix attachment and embedded that attachment inline with the rest of the text in the comment.
The server-side reflex will be responsible for populating the list of mentionable users that Tribute relies on. Head to app/reflexes/mentions_reflex.rb and fill it in like this:
class MentionsReflex < ApplicationReflex
  def user_list
    users = current_user
            .account
            .users
            .where.not(id: current_user.id)
            .map { |user| { sgid: user.attachable_sgid, name: user.name } }
            .to_json

    cable_ready.set_dataset_property(
      name: 'mentionsUserListValue',
      selector: '#comment_comment',
      value: users
    )
    morph :nothing
  end
end
This reflex queries the database for mentionable users and then builds an array of hashes with name and sgid keys.
Then we use the set_dataset_property CableReady operation that we used in the last chapter to update the userList value. When this operation runs, the value of userList changes, Stimulus fires the userListValueChanged callback, and Tribute gets an updated list of mentionable users.
Neat.
Recall that in the last chapter, after the chart reflexes run, we relied on a StimulusReflex afterReflex callback to update the charts. Why did we not take the same approach here? So we could demonstrate Stimulus values callbacks.
We could accomplish exactly the same behavior with a StimulusReflex callback in the Stimulus controller. Remove the userListValueChanged callback and add this instead and everything would work just the same:
afterUserList() {
  this.tribute.append(0, this.userListValue)
}
My preference is using afterUserList instead of userListValueChanged because there is a bit less ceremony involved with binding this and checking userList's value.
It is also worth noting that we could technically build the list of mentionable users in the initial call to comments#index and render the form with the userList value already populated.
Retrieving the users after the fact is not strictly necessary but we took this route because it gives us more chances to learn.
Before mentioning will work, we have a few more steps to take.
First, we need to update the User model to make it possible to create Trix attachments tied to users with the attachable_sgid method that we used in the MentionsReflex.
We also need the User model to define a to_attachable_partial_path so that user mention attachments can be displayed properly when a saved comment is rendered.
Head to the User model:
include ActionText::Attachable

def to_attachable_partial_path
  'users/mention_attachment'
end
users/mention_attachment does not exist yet. Create it from your terminal:
touch app/views/users/_mention_attachment.html.erb
And fill that new partial in:
Next, we need to attach the mentions controller to the DOM. In the comments form partial:
Here, we attached the mentions controller to the Trix editor and added the data-turbo-false attribute to prevent Turbo from caching the Trix editor. Preventing Turbo from caching this element prevents JavaScript errors caused by a cached version of the input that can occur when navigating back to the applicants page after leaving a comment. Instead of disabling caching on this element, we could also use Turbo's before-cache event to teardown Tribute before caching the page. Either option works fine but because there is no value in caching this form element so disabling the cache entirely is reasonable.
One last step before we test out mentioning users in the comment form. We need to add some basic styles to the list of users that tribute displays.
Create a new stylesheet where we will add these styles. From your terminal:
touch app/assets/stylesheets/mentions.css
And then fill that new file in:
.tribute-container {
  @apply rounded-sm border border-gray-100 overflow-hidden shadow;
  z-index: 60;
}
.tribute-container ul {
  @apply list-none m-0 p-0
}
.tribute-container li {
  @apply bg-white p-1 max-w-full text-gray-700;
  min-width: 15em;
}
.tribute-container .highlight {
  @apply bg-blue-500 text-white cursor-pointer;
}
.tribute-container .highlight span {
  @apply font-bold;
}
Most of these changes are cosmetic. The exception is the z-index value applied to the tribute-container class. Because the comment form is in a drawer (which has a higher z-index than normal page content), we need to bump the z-index of the tribute content above the slideover z-index or we will not be able to see the list of mentionable users when we test things out.
Last step — import the new stylesheet into app/assets/stylesheets/application.tailwind.css:
@import "mentions.css";
With these changes in place, make sure that you are logged in to an account with at least two users and head to the applicants index page. On the index page, open the comment drawer for any applicant and type an @ into the comment form input.
You should see the list of mentionable users pop-up. Choose a user to mention and see that the mention attachment adds seamlessly into the existing comment text.
Notify mentioned users
Mentioning a user in a comment is not very useful if the notified user is not notified of the comment. In this section, we will use the reusable Notifications base that we built earlier to send notifications when a user is mentioned in a comment.
Recall that notifications rely on single table inheritance, with each type of notification being defined in its own class. We will start by creating that new class. From your terminal:
touch app/notifications/applicant_comment_notification.rb
And fill the new class in like this:
class ApplicantCommentNotification < Notification
  def message
    "#{params[:user].name} mentioned you in a comment on #{params[:applicant].name}"
  end

  def url
    applicant_comments_path(params[:applicant])
  end
end
Nothing fancy here — each notification class defines message and url methods for rendering itself in the notifications list.
Then update the comment model to create a new notification each time a user is mentioned in a comment:
after_create_commit :notify_mentioned_users

def notify_mentioned_users
  mentioned_users.each do |mentioned_user|
    Notification.create(
      user: mentioned_user,
      type: "#{commentable.class}CommentNotification",
      params: {
        user: user,
        applicant: commentable
      }
    )
  end
end

def mentioned_users
  comment.body.attachments.select { |att| att.attachable.is_a?(User) }.map(&:attachable).uniq
end
There is a small wrinkle here. Technically, any number of users can be mentioned in the same comment. When a new comment is created, we run through all of the Trix attachments on the comment and create a notification for each user with an attachment.
With this change in place, login to two users on the same account. In one window, create a new comment that mentions the user logged in to the second window. You should see the new comment notification come through instantly for the mentioned user.
Great work so far in this chapter! To finish this chapter, we are going to move notification creation to a background job, setting up a basic Sidekiq installation in the process.
Background notifications
When a new comment is created, it is technically possible for dozens of user notifications to be created — imagine a very excited user mentioning every user on their account in the same comment.
Because notifications are created inline right now, the user who created the comment would need to wait for all of those dozens of notifications to be created before the request to create the comment would complete.
A better approach is moving non-essential updates like this to a background worker where they can be processed out-of-band, unblocking the user who created the comment and avoiding tying up resources unnecessarily.
To process background jobs in our application, we will use Sidekiq and ActiveJob.
Install Sidekiq from your terminal:
bundle add sidekiq
touch config/sidekiq.yml
And fill in the Sidekiq configuration file with a simple configuration to get us started (and lifted right from the Sidekiq documentation):
And then tell Rails that we want to use Sidekiq with ActiveJob. In config/application.rb:
config.active_job.queue_adapter = :sidekiq
Now that we have Sidekiq installed and ActiveJob configured to use Sidekiq, we need to create a new job to create user notifications. To do this, use the built-in Job generator. From your terminal:
rails g job NotifyUser
And then fill the job in at app/jobs/notify_user_job.rb:
class NotifyUserJob < ApplicationJob
  queue_as :default

  def perform(resource_id:, resource_type:, user_id:)
    resource = resource_type.constantize.find(resource_id)
    user = User.find(user_id)
    resource.create_notification(user)
  end
end
The NotifyUserJob will create multiple types of notifications (right now we can notify users of new mentions and new inbound emails), so we pass in the information that it needs to find the record and create the notification.
Now update the Comment model to create notifications in the background:
def notify_mentioned_users
  mentioned_users.each do |mentioned_user|
    NotifyUserJob.perform_later(
      resource_id: id,
      resource_type: 'Comment',
      user_id: mentioned_user.id
    )
  end
end

def mentioned_users
  comment.body.attachments.select { |att| att.attachable.is_a?(User) }.map(&:attachable).uniq
end

def create_notification(mentioned_user)
  Notification.create(
    user: mentioned_user,
    type: "#{commentable.class}CommentNotification",
    params: {
      user: user,
      applicant: commentable
    }
  )
end
notify_mentioned_users is still the method the after_create_commit callback runs. This method still loops through each mentioned user, but it sends each notification into the background with NotifyUserJob.perform_later.
After updating the Comment model, stop the Rails server and then update Procfile.dev to start sidekiq along with building assets and starting the Rails server:
worker: bundle exec sidekiq
Start the application back up with bin/dev, mention a user in a comment and see that notifications are still created as expected.
If you like, you can also use the new NotifyUser background job to create inbound email notifications. To do so, update the Email model like this:
after_create_commit :notify_recipient, if: :inbound?

def notify_recipient
  NotifyUserJob.perform_later(
    resource_id: id,
    resource_type: 'Email',
    user_id: user.id
  )
end

def create_notification(user)
  InboundEmailNotification.create(
    user: user,
    params: {
      applicant: applicant,
      email: self
    }
  )
end
Incredible work — with this last bit of code we have completed our Hotwired ATS application and you have reached the end of this book!
To see the full set of changes in this chapter, review this pull request on Github.
I appreciate you joining me on this journey, and I hope you have found this book to be information, valuable, and useful for you as a Ruby on Rails developer.
When you are ready, read on to Wrapping Up to recap what we built together and to find learning resources outside of this book to help you continue on your journey.